 Bouncer
BROWSER EXTENSION / WINDOWS
Your browser.
Connected to Bouncer.
A few steps, once per browser profile. Start with Chrome below, or follow the same steps in Edge or Brave.
The extension adds website activity, personal daily website limits and focused-video features. Ordinary scheduled website blocking works without it.
BEFORE YOU START
Install the Windows app first.
Open the installed Bouncer from Start. The installer includes the extension folder. You do not need a second purchase or a browser-store download.
This release uses Load unpacked: your browser loads the extension directly from Bouncer’s installed folder. It is not yet listed in browser stores. A managed work or school browser may prevent this; ask your administrator if the controls are unavailable.
chrome://extensionsDeveloper mode: top rightedge://extensionsDeveloper mode: left sidebarbrave://extensionsDeveloper mode: top rightSelect any screenshot to view it full size. Screenshots below show Chrome on Windows. Browser versions, themes and button positions can vary.
01 / OPEN EXTENSIONS
Reveal “Load unpacked.”
- Open Chrome and click its address bar.
- Type
chrome://extensionsand press Enter. For Edge or Brave, use the address above. - Turn on Developer mode. This reveals the Load unpacked button. You do not need to write code.

02 / ADD THE FOLDER
Choose Bouncer’s extension.
- Click Load unpacked.
- In the folder window, press Ctrl + L, paste the path below, then press Enter.
- Click Select Folder. Choose the folder itself, not an EXE, ZIP or manifest file.
C:\Program Files\Bouncer\BrowserExtensionIf Bouncer is installed elsewhere, use the path in Bouncer → Help → Browser extension setup → Add folder. The guide also has a Copy folder button.


Keep this folder in place. Do not load the older BrandedPage folder or a copy from Downloads.
03 / CHECK THE CONNECTION
Look for Bouncer in your browser.
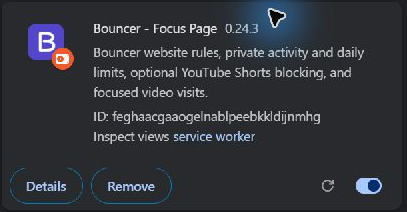
- Confirm its switch is on.
- Open the puzzle-piece Extensions menu beside Chrome’s address bar, then select Bouncer – Focus Page. Pin it if you want easy access.
- Check the popup’s desktop connection. An enabled switch alone does not prove it is connected.
Keep the installed Bouncer running. Its browser setup guide also shows a connection status that refreshes automatically. “Tracking disabled” can be normal: installation does not enable activity tracking.
04 / TRY WEBSITE ACTIVITY
Choose whether to measure your time.
For website time and daily website limits, open Bouncer → Activity and enable tracking using the Tracking controls. This is optional.
- Open a normal HTTPS website, such as
https://example.com. - Keep that browser in the foreground for about a minute. Avoid an internal page such as Extensions for this check.
- Return to Activity → Websites and look for the domain. Website time is part of browser time, not extra time.
You can pause, turn off, export or delete activity from Activity’s privacy controls. Pausing or turning off tracking also pauses personal daily limits; scheduled blocking operates separately. See the privacy notice.
Bouncer reports the browser connection and, if tracking is enabled, the test domain appears in Activity. Repeat setup for each browser and profile you use.
WHEN YOU NEED IT
Update & troubleshoot.
I updated Bouncer. Do I install the extension again?
Open your browser’s Extensions page. With Developer mode on, click the circular Reload arrow on Bouncer’s card, beside the enabled switch. Reopen the website tab and check the connection. Do not add a second copy. Reload and Remove are different controls.
The folder is missing, or I see a manifest error.
Confirm you selected BrowserExtension inside the installed Bouncer folder. If it is missing, repair Bouncer using its installer. Do not select the installer EXE or an archived ZIP. Contact support with the error wording if repair does not help.
The extension is enabled but not connected.
Open the installed Bouncer from Start. Check that you enabled the extension in the browser profile you are using, then restart that browser. In Bouncer, open Help → Status & recovery. Keep the error wording for support.
It is connected, but website time is empty.
Enable or resume Activity tracking. Keep a normal HTTPS website in the foreground and allow about a minute for a new reading. Internal browser pages and private windows are not suitable for this check.
I cannot find Developer mode or Load unpacked.
Use the browser address listed at the start of this guide. In Edge, check the left sidebar. A work or school policy may block loading extensions; ask the administrator rather than changing the organization’s controls.
How do I remove the extension?
Choose Remove on Bouncer’s extension card. This stops extension features in that browser profile. Scheduled website rules are separate: change those in Bouncer → Blocking. Reinstall the extension by following this guide.
Still stuck? Email Bouncer support with your browser name and the error wording. Do not send your license key or private browsing history.